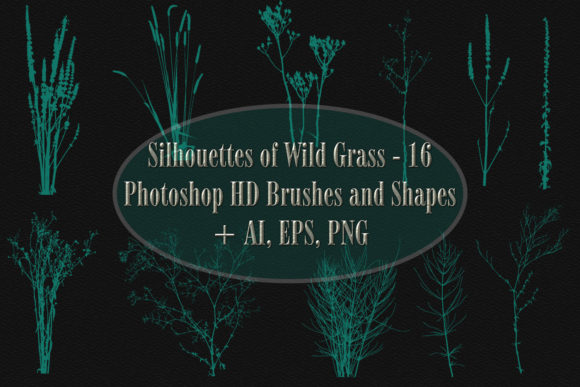
Mastering Nature Details with Silhouettes of Wild Grass for Digital Art
Adding realistic organic elements to digital compositions is often the difference between a flat, artificial image and a piece that breathes with life. Whether you are designing a book cover, creating social media graphics, or composing a complex landscape illustration, the foreground details matter immensely. This is where Silhouettes of Wild Grass becomes an indispensable tool in your creative arsenal. These resources are not merely clipart; they are versatile vector shapes and high-definition brushes designed specifically for Adobe Photoshop, allowing artists to integrate seamless nature details without the hassle of manual drawing or low-resolution pixelation.
However, many creators overlook the technical nuances of using such assets effectively. A common misunderstanding is that downloading a pack of brushes or shapes guarantees immediate professional results. In reality, the quality of your final output depends heavily on how you integrate these elements into your workflow. By understanding the specific capabilities of this collection—ranging from scalable vectors to HD brushes—you can avoid common pitfalls that lead to inefficient workflows or visually inconsistent designs.
The Trap of Raster Limitations and Why Vectors Matter
One of the most frequent mistakes beginners make is relying solely on raster images for graphic elements that need to be resized. When you stretch a standard JPEG or PNG of grass beyond its original dimensions, it becomes pixelated and blurry. This destroys the credibility of your artwork, making it look amateurish. The Silhouettes of Wild Grass package addresses this critical issue by including both vector shapes and high-resolution raster options.
The inclusion of a vector EPS-10 file and an Adobe Illustrator 10 file means you have access to mathematically defined paths. Unlike pixels, vectors can be scaled to any size—from a tiny icon to a massive billboard print—without any loss of quality. This is crucial for entrepreneurs and marketers who may need to repurpose a single design across various mediums, such as business cards, websites, and large-format banners. If you ignore the vector files and only use the PNGs, you limit your flexibility and risk poor print quality.
Practical Advice: Always start your design process by importing the vector EPS or AI files if you anticipate needing to resize elements later. Use the vector shapes in Photoshop for crisp edges that remain sharp regardless of transformation. Reserve the PNG files for quick mockups or when you need a transparent background immediately without editing paths.
Misusing Brushes: Density and Opacity Errors
Another area where artists often stumble is the application of brush tools. The package includes a .CSH file containing vector shapes and a .ABR file with HD brushes. A common error is using these brushes at 100% opacity and uniform density, which results in a repetitive, "stamped" look that lacks natural variation. Real wild grass grows in clusters, with varying heights, angles, and densities. Applying the brush in a straight, even line looks artificial and disrupts the visual flow of the composition.
Furthermore, some users fail to adjust the brush dynamics. Photoshop allows you to control scattering, size jitter, and angle jitter. Ignoring these settings means every blade of grass looks identical, which is rarely found in nature. This lack of variation can make your artwork feel static and lifeless. For professionals, this attention to detail is what separates good work from great work.
Better Approach: When using the HD wild grass brushes, lower the opacity to build up layers gradually. Utilize the scattering settings to create irregular clumps rather than uniform rows. Rotate your canvas occasionally to ensure the grass follows the natural perspective of your landscape. By varying the pressure and angle, you mimic the chaotic beauty of real vegetation, adding depth and realism to your scene.
Overlooking File Compatibility and Organization
Technical compatibility is often an afterthought until a file fails to open. This collection is compatible with Photoshop CS3 and above, which covers the vast majority of modern creative workflows. However, a mistake some freelancers make is not verifying their software version before purchasing or downloading assets. While rare today, using extremely outdated software can lead to import errors or missing features.
Additionally, the sheer size of the archive—26.7 MB—indicates a high level of detail, particularly in the big transparent PNG file which measures 3308x10000 pixels. Users sometimes complain about slow performance when working with such large files, but this is usually due to improper layer management rather than the asset itself. Opening a 10,000-pixel-high PNG on a low-RAM machine without optimizing other layers can cause lag.
Solution: Before integrating the large PNG silhouettes, ensure your project resolution matches your output needs. If you are designing for web use, you may not need the full 10,000-pixel height. Resize the layer intelligently after import. For print, keep the original resolution but consider rasterizing the layer once you are satisfied with the placement to free up system resources. Always keep your ZIP archive backed up, as re-downloading can be time-consuming if your internet connection is unstable.
Evaluating Quality Before Commitment
When choosing digital assets, it is easy to focus only on the preview image. However, savvy creators know to check the underlying structure. With Silhouettes of Wild Grass, you should verify that the vector paths are clean and closed. Messy vectors with unnecessary anchor points can be difficult to edit and may cause printing issues. Since this package provides editable AI and EPS files, you have the opportunity to inspect and clean up paths if necessary, ensuring smooth curves and professional-grade outlines.
Moreover, consider the color flexibility. Because these are silhouettes, they are inherently monochromatic, which is a strength, not a weakness. You can easily change the sign to any size and color without loss of quality. This makes them ideal for overlaying on different backgrounds, from sunset skies to dark forest floors. A common oversight is forgetting to adjust the blending modes. Simply placing black grass on a dark background will make it invisible. Using blending modes like "Multiply" for light backgrounds or "Screen" for dark elements can help integrate the grass more naturally.
Maximizing Value Through Versatility
To get the most out of this resource, think beyond simple landscapes. These silhouettes can be used for:
- Typography Masks: Use the grass shapes to mask text, creating a organic, overgrown effect on headlines.
- Border Elements: Create natural frames for invitations or certificates using the vector shapes.
- Texture Overlays: Use the HD brushes to add subtle foreground depth to photography edits.
- Logo Design: Incorporate the clean vector lines into eco-friendly or nature-themed brand identities.
By diversifying how you apply these tools, you increase the return on investment for your time and money. Instead of viewing them as a one-time use item, treat them as a foundational component of your design library.
Final Thoughts on Integration
The key to successful digital art is not just having the right tools, but knowing how to wield them. Silhouettes of Wild Grass offers a robust set of resources that bridge the gap between convenience and quality. By avoiding the pitfalls of raster-only reliance, static brush application, and poor file management, you can elevate your projects significantly. Remember to rate the product if you find it useful, as feedback helps creators improve future releases. With careful attention to detail and a strategic approach to layering and scaling, these wild grass elements will become a staple in your creative process, enhancing the natural beauty of your artworks with precision and ease.